December 15, 2010

Bacon Wrapped Pork Tenderloin

When coming up with our Christmas dinner menu nothing was tempting me into the kitchen. I looked to Mr. Sideline Chef for his suggestions and after he sat there playing his video game I figured he was too deep in concentration that he had selective hearing. I had my back to him at the laptop doing my "research" when I hear, "Pork tenderloin. We haven't had that in forever." What? He speaks. Oh it's halftime on his game, figures. Haha!

After entering pork tenderloin into the search engine on my favorite recipe website, MyRecipes, there it was at the forefront, Bacon Wrapped Pork Tenderloin. The search was over and I couldn't wait to eat bacon for dinner. Bacon makes me giddy.

This recipe was a snap to put together and with only 3 ingredients it didn't take much mental power or motor functions making this an ideal entree for our Christmas dinner. Mr. Sideline Chef would tell you the star of the show was the pork tenderloin but I would tell you it was the bacon after I stole all of the bacon off of the rest of the pork tenderloin. For dinner I had bacon with the Squash and Parsnip Gratin. The bacon had crisped and had such an amazing flavor combination from the Montreal Steak Seasoning. It was incredible. I'm drooling on the keyboard while typing this. The original recipe stated that this would take a total of 35 minutes to cook but all of my past pork tenderloin experiences had me scratching my head wondering what super oven they cooked theirs in. After cooking for the initial 25 minutes uncovered I had to cover it with foil to prevent it from drying out and lowered the temperature to continue cooking it another 30 minutes until it reached 160°.

MyRecipes.com and Southern Living, April 2008
Makes 4 servings

Stars of the Show: (A standing ovation for BACON!!!)
  • 1 (1 pound) pork tenderloin
  • 1 tsp steak seasoning - I used McCormick Grill Mates Montreal Steak Seasoning.
  • 3 bacon slices, cut in half - I went bacon happy and lost count after layering on slice number three. Who's counting anyway? I turn a blind eye when it comes to bacon.
And Action:

Trust the meat thermometer first and foremost for your cooking times. I found mine needed to be cooked longer. Preheat oven to 425°. Sprinkle the seasoning over the pork tenderloin. Wrap the pork with the bacon slices and secure with wooden toothpicks. I sprinkled more seasoning on top of the bacon but you can either do so or not. Place the pork tenderloin on a lightly greased aluminum foiled lined roasting pan.

As you can see I don't follow instructions and forgot to lay down the foil.
Bake for 25 minutes or until a meat thermometer reads 155° in the thickest spot of the meat. Turn the oven to broil. Broil 5 inches from heat for 3-5 minutes until bacon is crisp. Remove from the oven and cover the pork with foil and let stand for 10 minutes until the meat thermometer reads 160°.

December 14, 2010

Squash and Parsnip Gratin


We celebrated our Christmas on Sunday night since we will be out of town for the holiday. Every year we celebrate our Christmas Eve and Christmas the weekend before our road trip. I was looking forward to cooking and preparing a sit down dinner for Mr. Sideline Chef, itty bitty, and I but the truth is... I was dead tired when the time came to putting in the effort to do so.

After accomplishing a few things around the house that morning we headed to the furniture store to pick up a new couch... I am beyond giddy over this one... but I wasn't even drained at this point. What did it for me was when Mr. Sideline Chef stated our next stop was to Walgreens to get flu shots. My hands went pale and my blood sugar dropped instanteously. I was physically ill. He could see the horror in my eyes and the sweat beading on my forehead. In a moment of understanding he told me I didn't have to get one. That still didn't make it better. The mere mention of needles made me sick to my stomach. Yes, I have a tattoo behind my ear of my son's birthdate and that was 1 minute of pain I would only put myself through if I was heavily sedated had another baby. Needing to get food into my system he suggested the "golden arches" (to keep our toddler from knowing we were headed and having a tantrum in the backseat). A sandwich each to hold us over and we were off to Walgreens.

It was a Mickey Mouse Christmas Celebration!
By the time we got home I saw the mound of dishes in the sink, the dishes needing to be emptied from the dishwasher, and looking at the clock reading 5:30 p.m. I really didn't want to cook. I even shed a few tears. I don't know where they came from... sheer exhaustion... or tears of joy I didn't have to get a shot. Who knows? As the few tears rolled I pushed on to create a dinner that was ate right before bed but oh so worth the 3 hours spent waiting for it to be done.
I made Bacon Wrapped Pork Tenderloin (recipe tomorrow), Squash and Parsnip Gratin, and just heated up some Pillsbury Grands Biscuits since I ran out of sugar from making Peppermint Stick Cocoa on Saturday night. He was lucky that can of biscuits hadn't been used for breakfast biscuits or else the one item he had requested for dinner wouldn't have made it to the table.

Parsnips and I are in a love/hate relationship. Acorn squash being beautifully vibrant and orange stood out next to the white chunks of the parsnips making them easy to segregate. I wasn't into the parsnips tonight. I was into them the other night when I made Roasted Potatoes, Parsnips, and Carrots with Horseradish Sauce. Their licorice-y taste was turning me off tonight. The acorn squash on the other hand was fantastic and thankfully there was more of it than parsnips.

MyRecipes.com and Cooking Light, November 1995
Makes 6 servings (Serving size = 1 cup)

Stars of the Show: (Standout performance from the acorn squash!)
  • 1/3 cup dry breadcrumbs
  • 1/4 cup fresh chopped parsley - I used dried parsley.
  • 1/2 tsp salt
  • 1/4 tsp dried oregano
  • 1/4 tsp thyme
  • 1/4 tsp black pepper
  • 4 cups peeled, cubed, acorn squash (about 1 pound)
  • 2 cups peeled, cubed, butternut squash (about 1/2 pound) - When writing down the ingredients I left this out and didn't realize it. The side notes on the original recipe state that any combination of winter squash may be used to make up the 6 cups of squash.
  • 2 cups peeled parsnips - I will be leaving these out next time.
  • 1 tbsp olive oil
  • cooking spray
  • 1/2 cup (2 oz) shredded reduced fat sharp cheddar cheese
  • oregano sprigs for garnish
And Action:

Combine the first 6 ingredients in a large bowl and stir to mix. Add squashes and parsnips, and oil, tossing to coat. Spoon mixture in a 2-quart casserole dish coated with cooking spray. Cover and bake at 325° for 1 1/2 hours. Sprinkle with cheese and bake uncovered for an additional 15 minutes. Garnish with oregano if desired.

Nutritional Information:
Calories: 178 (24% from fat)
Fat: 4.8g (sat 1.5g,mono 2.4g,poly 0.4g)
Protein: 5.6g
Carbohydrate: 31.1g
Fiber: 3.6g
Cholesterol: 6mg
Iron: 1.8mg
Sodium: 323mg
Calcium: 189mg

December 13, 2010

Maple Glazed Sour Cream Doughnut Holes

No milk and cookies in our house for Santa. Nope. He's going to receive hot chocolate and doughnuts from here on out as our new family tradition. As I shared with you yesterday, I want to create new and bring into our home traditions both Mr. Sideline Chef and I grew up enjoying. One of our new traditions is leaving hot chocolate and doughnuts out for Santa. It's unique and I think it's something fun for itty bitty to have a tradition that sets his family apart from the others.

Luckily my skin is still intact and so is the house. Making doughnuts was such an overwhelming experience because I had no prior hands on experience of frying and let alone making doughnuts. My cooking anxiety was at Level 3 Meltdown Mode. The dough was sticky which I found out was the way it was supposed to be. The candy thermometer kept climbing above 375° and I didn't know how to keep the temperature constant since we don't have controls on our stove in our apartment, just low-high. I was panicked with having to drop the dough balls, which I made larger because the suggested portion sizes seemed too small and I didn't realize they were going to expand. Yea... I know. I ended up using two spoons to lower the dough balls into the vat of oil and luckily no oil splatters or skin burns! Go me! At one point when transferring the cooked doughnut holes to the plate of paper towels a tiny bit of grease hit the burner and flamed up. Not bad but enough to scare me and having Mr. Sideline Chef race in to make sure my eyebrows were still there for aesthetically reasons. I was in panic mode from start to finish of the frying part. Once all of the doughnut holes were cooked I was finally excited and feeling like I could breath easy again. Glazing was the easiest part next to eating.

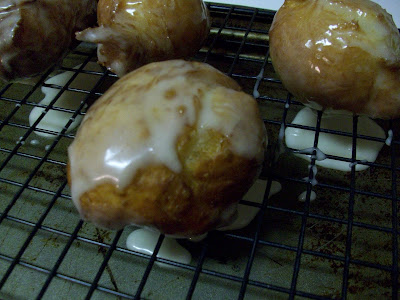
We had invited the neighbors over to enjoy the doughnut holes and the Peppermint Stick Cocoa with us. After it was all said and done I feel a little more confident with a redo for next year's "Christmas Eve". The Maple Glazed Sour Cream Doughnut Holes were incredible! You get the crispness when you bite into them with the pillowy insides and the sweet maple glaze was out of this world. Eating these in combination with the Peppermint Stick Cocoa easily put us all into food coma.

MyRecipes.com and Cooking Light, April 2010
Makes 12 servings (Serving size = 3 doughnut holes)
I ended up with 15 doughnut holes because I didn't think the size of the dough balls was correct and when I make these again I will be sure to do it my way again. I just made a ball that fit comfortably in the inside of my palm. I have teeny tiny hands though.

Stars of the Show:
  • 6 tbsp warm water (100° to 110°)
  • 1/4 cup sugar
  • 1 1/8 tsp dry yeast
  • about 1 1/2 cups all-purpose flour, divided
  • 1/8 tsp salt
  • 3 tbsp sour cream
  • 1 egg, lightly beaten
  • cooking spray
  • 6 cups peanut oil
  • 1 1/2 cups powdered sugar
  • 2 tbsp maple syrup
  • 2 tbsp water
And Action:

Combine the first 3 ingredients in a large bowl. Let stand 5 minutes or until bubbly. Lightly spoon 1 1/4 cups flour into dry measuring cups. Combine the flour and salt in another bowl. Add sour cream and egg to yeast mixture, stir until smooth. Add flour mixture and stir to form the dough.

Turn dough onto a lightly floured surface. Knead for about 3 minutes until smooth and elastic. Add 1 tbsp at a time to prevent hands from sticking to the dough. Place dough in a bowl coated with cooking spray. Cover bowl with plastic wrap and let rise in a warm place (85°), free from drafts, 1 hour or until doubled in size.

Punch dough down. Divide dough into 36 equal portions. Roll each into a ball. Cover with plastic wrap coated with cooking spray and let stand for 30 minutes.

Clip a candy thermometer on the inside of a dutch oven and add the oil to the pan. Heat oil to 375°. Combine powdered sugar, maple syrup, and 2 tbsp water into a bowl and stir until smooth to create the glaze. Place 9 dough balls in the hot oil, fry 2 minutes (mine cooked a lot quicker and I just eyeballed the doneness by color) and turn them as necessary. Make sure the oil remains at 375°. Remove the doughnut holes from the pan and lay them on a plate lined with paper towels to drain. Dip doughnut holes in the glaze and remove with a slotted spoon. Place them on a cooling rack with a baking sheet placed underneath. Repeat with the remaining doughnut holes.

Nutritional Information:
Calories: 178
Fat: 5.9g (sat 1.4g,mono 2.5g,poly 1.6g)
Protein: 2.4g
Carbohydrate: 29.3g
Fiber: 0.5g
Cholesterol: 19mg
Iron: 0.9mg
Sodium: 33mg
Calcium: 11mg

December 12, 2010

Peppermint Stick Cocoa

I am kicking myself right now for not saving even one glass jar this year. Had I saved them I could have layered this Peppermint Stick Cocoa into the jars and tied a ribbon on them and gave them out as gifts and stocking stuffers. I know to do so this upcoming year.

Growing up I don't remember having set Christmas traditions. My memories from Christmas Eve were that us kids were allowed to open up one present and milk and chocolate chips cookies were left for Santa. The next morning we would wake to find that Santa had polished off the chocolate chip cookies and Rudolph had taken a drink of milk. The way we knew Rudolph had drank the milk was because it was tinted red from his nose. It was exciting seeing the cookie crumbles and the evidence that even Rudolph had visited our house while we were all fast asleep. Presents would be opened at either our house or our grandparents home and then we played with our toys until dinnertime.

Having a family of my own and not living close to our family members made me really want to start setting our own family traditions. I think it is so important to have provide those memories for my own child.

Because we go to Jason's hometown back in Ohio every year in December in the middle of the month into the new year we have our Christmas Eve and Christmas the weekend before we leave on our road trip. Last night was our "Christmas Eve" and as our new tradition, if you can call it that, since tradition implies that something is the norm, we decided on having hot chocolate and doughnuts.

Santa isn't going to be seeing milk and cookies in this house but I'm sure he wouldn't mind a change up along his route for some Peppermint Stick Cocoa and Maple Glazed Sour Cream Doughnut Holes (recipe tomorrow).

Before mixing all of the ingredients together I layered them into my Tupperware container to get the visual effect of what the jars would have looked like. It appeared like those bottles of colored sand I created as a kid. After adding 1/3 cup of the Peppermint Stick Cocoa to my oversized mug I added 1 cup of boiling water and just for the occasion five ginormous marshmallows. The original recipe didn't call for the marshmallows but I had them in the pantry and hot chocolate with marshmallows is a must.

I think this would be even better with warm milk instead of the boiling water to give it a creamier taste. This was a festive addition for the holiday and a tradition I'll be looking forward to every year to come. Those doughnuts... they'll be worth checking back tomorrow for the recipe. In the meantime keep those toesies warm and snuggle under a blanket with a big mug of this cocoa.

MyRecipes.com and Sunset, December 2004
Makes 1 Quart mix or 12 hot cocoa serving (1/3 cup cocoa mix to 1 cup water)

Stars of the Show:
  • 1 cup powdered milk
  • 1 cup unsweetened cocoa powder
  • 1 cup sugar
  • 1/2 tsp salt
  • 1/2 cup miniature chocolate chips
  • 1/2 cup crushed peppermint candy
And Action:

Layer powdered milk, cocoa powder, sugar, salt, chocolate chips, and peppermint candies. Just before serving mix the ingredients. So simple. Store the remaining mix in an airtight container.

Nutritional Information:
Calories: 172 (17% from fat)
Protein: 3.7g
Fat: 3.2g (sat 1.9)
Carbohydrate: 37g
Fiber: 2.6g
Sodium: 136mg
Cholesterol: 1mg

December 10, 2010

Roasted Potatoes, Parsnips, and Carrots with Horseradish Sauce

My absolute favorite way to eat my veggies is by roasting them in a little bit of olive oil and sprinkled with spices. Along with finding the recipe for Mashed Yukon Gold Potatoes with Horseradish Butter I found this one as well to help use up the jar of horseradish that has been sitting in the fridge until the occasional roast beef sandwich was made. Roasted veggies is one of those foods that makes me giddy. I look forward to nights when I create the menu to have a side dish of them and even when Mr. Sideline Chef is out on the road I'll make a pan of them as a stand alone meal. I'm easy to please.

Carrots are one of those foods I couldn't stand as a kid. I could eat them raw but cooked any way just made my stomach turn and my mother's hair grey with trying to get me to eat them. It wasn't until 2 years ago when she had made a large pan of roasted veggies for us at Easter that I gave them a shot and was smitten with the sweetness from roasting.

I recall eating parsnips one time in my childhood. I know they weren't well received and that explains why my mother never bothered making them again. My tastes have since changed in the past 3 years. Mr. Sideline Chef swears it was his love of mushrooms and my love for him that turned me into a mushroom lover and carrots are also now on my radar. Why not give parsnips another go?

This was a score in my personal playbook. Itty bitty had stuffed himself off of leftover pizza and Mr. Sideline Chef was surprised with his favorite and thus filled up on it leaving no room for roasted veggies. Excuses, excuses. More for me and my feelings were definitely not hurt.

The horseradish sauce was yogurt that had been drained of the excess liquid and then mixed with horseradish and salt. Simple and so flavorful and paired well with the roasted vegetables. I damn near licked the plate clean. If Mr. Sideline Chef wasn't home I would have gone wild but since I didn't want to turn his stomach I resorted to cleaning my plate of the sauce with my finger when he wasn't looking. Shameless. Beware Mr. Sideline Chef... your leftovers won't last longer than tomorrow and these roasted veggies will be making an appearance on a plate near you!

MyRecipes.com and Cooking Light, November 1999
Makes 6 servings (Serving size = 1 cup vegetables and 2 tbsp horseradish sauce)

Stars of the Show for the Horseradish Sauce:

  • 1 (8 oz) carton plain low-fat yogurt
  • 2 tbsp prepared horseradish
  • 1/4 tsp salt
And Action:

Spoon yogurt onto several heavy duty paper towels and spread to 1/2-inch thickness. Cover with additional paper towels and let stand for 5 minutes. Scrape the yogurt into a bowl and mix the horseradish and salt. Cover and chill until ready to use.

Stars of the Show for the Roasted Potatoes, Parsnips, and Carrots:


  • 1 lb (1-inch thick) sliced carrots
  • 1 lb parsnips, peeled, and cut into 1-inch pieces
  • 1 lb fingerling potatoes, halved lengthwise - Our local market did not have fingerling potatoes. I had a large bag of Yukon Gold potatoes left from the night I made Mashed Yukon Gold Potatoes with Horseradish Butter. You can also substitute small red potatoes.
  • 1 tbsp olive oil
  • 2 tsp chopped fresh sage
  • 1/2 tsp salt
  • 1/4 tsp black pepper
  • 12 garlic cloves, peeled (about 1 garlic head) - I had minced garlic on hand.
  • 4 large shallots, peeled and quartered
  • 4 thyme sprigs - I used dried thyme.
  • cooking spray
And Action:

Preheat oven to 450°.

Before the magic happens.
Combine carrots, parsnips, and next 8 ingredients (parsnips through thyme) in a shallow roasting pan coated with cooking spray. Bake for 20 minutes. Stir. Reduce oven temperature to 400° and bake an additional 30 minutes. I like my veggies with more color and kept stirring mine after the 30 minute mark every 10 minutes for an additional 20 minutes. Discard thyme if you are using the sprigs. Serve with the horseradish sauce.

Nutritional Information:
Calories: 197 (15% from fat)
Fat: 3.3g (sat 0.8g,mono 1.9g,poly 0.4g)
Protein: 5.5g
Carbohydrate: 38.5g
Fiber: 5.5g
Cholesterol: 2mg
Iron: 2.1mg
Sodium: 371mg
Calcium: 129mg

December 09, 2010

Mashed Yukon Gold Potatoes with Horseradish Butter

I had a jar of prepared horseradish sitting in the fridge that rarely gets used except for the occasional addition to a roast beef sandwich. It was time to put some of it to use. I found a recipe for Mashed Yukon Gold Potatoes with Horseradish Butter and knew I needed to make it. Since setting out on my weight loss journey I rarely top my potatoes with any fatty condiments and such. I feel less guilty for topping my tatoes when I make the recipe or I am eating out.

Mr. Sideline Chef loves mashed potatoes and could very well have them with every meal. I on the other hand when eating them tend to over do it and get filled up off of them and end up with stomach aches that turn my stomach at the very mention of mashed potatoes days after. Don't get me started on KFC commercials with them dumping gravy onto the pile of mashed potatoes.

Not this mashed potato recipe. It came from Cooking Light and it sure tasted light. The mashed potatoes themselves tasted to me like a plain potato that had been boiled and mashed. The amount of milk, chicken broth and sour cream didn't do much to make them very creamy. The flavor came from the horseradish butter. Butter flavored with shallots, parsley and horseradish.

I loved the horseradish butter. Of course a serving size of the butter wasn't even to satisfy but when does a serving size of butter satisfy? If you are not watching your weight then I suggest making more of it. Mashed potatoes and pools of butter go hand in hand. Mr. Sideline Chef smeared his butter on just a small portion of the tatoes and told me, "I'm not sure what I think." He left it at that. I swear this man doesn't even taste the food. It enters his mouth and I think it just gets swallowed. There were no leftovers if that says along about how much he liked the recipe.

I think the horseradish butter would be delicious spread on warm biscuits as well with some roast beef. What's not to love when it's quick, easy, and delicious?!

MyRecipes.com and Cooking Light, December 2009
Makes 8 servings (Serving size = 1/2 cup mashed potatoes and 1 1/2 tsp horseradish butter)

Stars of the Show for the Horseradish Butter:
  • cooking spray
  • 1 tbsp minced shallots
  • 1/4 cup softened butter
  • 1 tbsp fresh chopped parsley - I used dried parsley.
  • 2 tsp prepared horseradish
And Action:

Heat a small nonstick skillet coated with cooking spray over medium heat. Add shallots and to skillet and cook 1 minute (This step seemed like a waste since 1 minute didn't seem like enough time. I took mine out at the suggested 1 minute but would skip this step entirely next time.) Remove from heat and cool.

Combine shallots, butter, parsley, and horseradish in a small bowl and blend well. Transfer butter mixture to a sheet of plastic wrap. Shape butter mixture into a 3 inch log. Use the plastic wrap to help mold into shape. Wrap tightly and refrigerate until firm.

Stars of the Show for the Mashed Yukon Gold Potatoes:
  • 6 1/2 cups cubed, peeled Yukon Gold Potatoes (about 2 1/2 pounds of potatoes)
  • 1 bay leaf
  • 1/4 cup 1% low fat milk - We only buy nonfat milk in our household.
  • 1/4 cup fat free, less sodium chicken broth
  • 1/4 cup reduced fat sour cream
  • 1 tsp salt
  • 1/4 tsp fresh ground black pepper
And Action:

Place potatoes and bay leaf in a large pot and cover with water. Boil. Cover and reduce heat to a simmer. Cook 20 minutes or until fork tender. Drain and discard bay leaf. Combine milk and chicken broth in a microwave safe dish and heat for 1 minute. Add milk mixture, sour cream, salt and pepper to the potatoes. Mash the potatoes until well blended. Serve with the horseradish butter.

Nutritional Information:

Calories: 182

Fat: 6.7g (sat 4.2g,mono 1.8g,poly 0.3g)

Protein: 4g

Carbohydrate: 26.1g

Fiber: 1.8g

Cholesterol: 18mg

Iron: 1.3mg

Sodium: 369mg

Calcium: 21mg

December 08, 2010

Sweet Carrot Salad

After a day of shopping for our winter essentials for our trip North to Ohio and putting itty bitty in and pulling him out of his car seat 6 times I was worn out. My hands were cold too. Being cold should have made me want something to warm myself up. Not the case last night. I didn't want to stand in the kitchen and put anything together. Not even the prospect of making a new recipe was exciting me. What got me in the kitchen was the thought that Mr. Sideline Chef was at work all day while itty bitty and I had a very enjoyable day out together. The guilt set in that this man busts his balls at work all day and I get to stay at home and reap the benefits of his hard work. He never complains about the sink full of dishes or the floors that get mopped once in a blue moon a week. He deserves a prepared meal when he gets home, it's the least I could do. Although he prefers the enthusiastic hello, hug and kiss when he walks through the door. He's pretty incredible.

We started at Ross and picked up our winter hats, gloves, jackets, an outfit with jeans for itty bitty, and some other items. Next stop was to the mall for the hunt of a Christmas top for itty bitty since his black slacks from the year prior still fit him. After having a mommy/son lunch with him and spoiling him at Cookie Place with an M&M cookie we set out to our last stop in the mall, Macy's, and luckily found the only item that was Christmasy and in his size... a black and grey striped sweater with a skull wearing a Santa hat... I'm sure the family will be thrilled when they receive Santa photos this year. What is it with little girl's having an entire section designated for frilly dresses and boys having a single rack with tuxedos? It's a crock o' shit if you ask me.

With the entire list of needs marked off and the wallet a bit lighter (boo!) we set out to run the rest of the errands. Library, bank, and then grocery shopping. Even though I kept itty bitty out 2+ hours into nap time we had no meltdowns and I enjoyed our time together.

Mr. Sideline Chef arrived home and I still hadn't settled on what we were having for dinner and I hadn't wrote down my recipes yet. Dinner was an hour and a half later. Fish fillet with Yukon Mashed Potatoes with Horseradish Butter (recipe tomorrow) and a side dish of Sweet Carrot Salad.

Didn't like getting their photo taken.

The Sweet Carrot Salad was part of a Moroccan Passover Feast menu. Mr. Sideline Chef would have possibly enjoyed the Passover Vegetable Soup but wanting to only dump one new recipe to try on him I settled on just making the Sweet Carrot Salad.

This makes for a vibrant orange side dish. It has a subtle tang from the lemon juice but is tamed by the sugar added. It is flavored with cinnamon, cumin, parsley, and paprika. The cumin is the dominating flavor in this side dish. It is also served chilled. Mr. Sideline Chef ate what was on his plate but didn't comment until I asked directly what he thought, "Well... I ate it. I didn't like it." Itty bitty took one bite and started placing his carrot slices from his high chair tray to the table to clear them off his plate. Me, I thought it was delicious. First bite I wasn't convinced but after a second bite I really liked it. It'll make a nice side dish to go with my sandwich today for lunch.

MyRecipes.com and Cooking Light, March 1997
Makes 4 cups (Serving size = 1/2 cup)

Stars of the Show:
  • 5 cups (1/2 inch thick) carrot slices
  • 2 garlic cloves, halved - I used minced garlic since I always buy garlic in the jars to help cut on prep time. I'm not sure if the garlic bits really did much to change the flavor since the cumin is the dominant taste in this dish.
  • 2/3 cup fresh lemon juice - 3 small lemons gave me half of this amount.
  • 1/4 cup fresh chopped parsley - I used dried parsley.
  • 2 tbsp sugar
  • 1 tsp ground cinnamon
  • 1/2 tsp cumin
  • 1/2 tsp paprika
And Action:

Combine carrots and garlic in a large pot. Cover with water and bring to a boil. Cook 8 minutes or until tender. Drain. Discard garlic.

Looks like artwork!
Combine lemon juice and the remaining ingredients in a medium bowl and stir well. Add carrots to lemon juice mixture and toss to coat. Serve salad at room temperature or chilled.


Nutritional Information:
Calories: 30 (3% from fat)

Fat: 0.1g (sat 0.1g,mono 0.0g,poly 0.0g)

Protein: 0.6g

Carbohydrate: 8g

Fiber: 0.9g

Cholesterol: 0.0mg

Iron: 0.5mg

Sodium: 31mg

Calcium: 19mg

December 07, 2010

Awarded To Me

Because I know your time is valuable and this post is long winded feel free to just skip down to the part that really has any meaning... the part where I finally get around to awarding others with this award after my mindless ramblings about my life. I promise, no hurt feelings if you don't care to learn more about me. I learned at an early age the world does not revolve around me.

I was awarded with this by Ping the other morning. It was such a nice surprise since I am new to food blogging and to be recognized by a fellow blogger. Not having any tech savy I struggled to figure out how to even get the award onto my blog. Copy and paste. Smacking myself in the forehead.

The "rules" for accepting the award claim that I need to give a thank you shout out to the person who gives me the award, share 7 boring things about myself, and pass the award onto other bloggers.

Once again I'd like to thank Ping for thinking about me and presenting me with this award. It meant a lot to me and it was very much appreciated!

Now for the useless facts about the Pretend Chef that you didn't know before and are probably wishing you didn't know now.
  1. I live with my guy, Mr. Sideline Chef. We are not married but have been together for 3 1/2 years. No we do not celebrate monthly anniversaries nor are we the mushy gushy couple who make you want to vomit while out in public. We also have a baby boy together, Jason Jr, my itty bitty, as I often refer to him as. Jason Jr is 2 1/2 years old and runs the workings of the household. Amazing how having a child turns your world upside down but in a FANTASTIC way! We also have not one but TWO Jack Russells named Samson (4 years old) and Maximus (1 year old). I am crazy to have all of this chaos under a two bedroom apartment.
  2. We live on the outskirts of Houston, Texas. Neither one of us understands the craze of Texans and their motto of "Texas is the best because I was born here", they probably have never seen any other parts of the country. I was raised in Las Vegas, Nevada but my family moved us to the Pacific NW my high school years. Mr. Sideline Chef is from Ohio. We met while he was living at a motel I was working at. Due to fraternization rules I put in my two week notice and followed my heart back to Texas. We live in Texas only because we are here for work.
  3. I'm a very sarcastic person. I've made my own mother cry on several occasions. I swear I'm not a malicious person she was just having sensitive days and I tend to be insensitive.
  4. I grew up being a tomboy. My mother thought I was disgusting for taking great joy in showing off my battle wounds from playing football in the street with the boys or getting a chipped tooth the night of my graduation party in the boxing ring with a fellow male classmate.
  5. Although I was a tomboy at heart the only sports I ever took an interest in were gymnastics and cheerleading. I once tried out for baseball and could pitch better than the boys but school rules would not allow me to play except for softball... not my thing... I liked hanging out with the boys more.
  6. I was the kid in school you wanted to punch in the back of the head. I had a high GPA and graduated 6th in my class. I never had to study because I easily retained the useless crap we were learning in school. I took AP classes and shake my head for overloading my Senior year. The teachers loved me because I did everything by the book other than keeping my mouth shut. I never got in trouble for my condition I call diarhea of the mouth. I often times picked debates with others just to ruffle their feathers. Whatever my political views were I would go with the opposite if the person I was talking with didn't agree just for the sake of a debate. I once made another female classmate cry over her love of going green. I believe in reuse, recycle but because she did I didn't only for the sake of a debate.
  7. From #6 you might think I suffer from "little person syndrome" once you learn that I measure in at 4'11". This really isn't true. Now I pick and choose my battles. I rarely battle. If someone feels more strongly about something I let them revel in their rightness. I don't feel it's necessary to have the last word and now I know when it's best to bite my tongue. I live and learn everyday and set out to make today better than the last.
Now that you've learned a little bit more about me, the Pretend Chef, or as my mother named me, Rochelle, you can use any of the above 1-7 for great conversation starters. I'm sure it'll make for a rather interesting convo over lunch.

Awarding other bloggers... I'm not tech savy like I have previously mentioned. The only way I know how to award the others is by making a list, checking it twice, sorry in the spirit of the holiday, and allowing the others to copy and paste if they so choose to have the award on their blogs.

  • Cake Duchess - These cupcakes are tempting enough to make me want to break any sort of health kick I'm on at the moment with trying to take off the last 10 pounds of my weight loss journey.
  • Cookin' Canuck - Serving up veggie side dishes to her family that are drool worthy like this one.
  • Jeanette's Healthy Living - She is continuously giving me reason to expand my tastes and try new foods that help fight off various health issues such as cancer.
  • Kimba's Kitchen - Have you seen the food that comes out of her kitchen? If not head over there now, with a bib, because all of her dishes are drool worthy!
  • More Than A Mount Full - A Culinary Journey - This man shares his blog space with other food bloggers on Fridays via Guest Posts. How amazing is that? Talk about a heart of gold.
  • No Face Plate - Creativity like this makes me envious to no end.
Please check out their blogs and show them some love. I FOLLOW these blogs for a reason. I have nothing better to do with my mornings until my son wakes up. In all seriousness... you better do it or else Santa won't be stopping by your house on Christmas eve. I joke, I joke.

December 06, 2010

Pumpkin Seeds

Scratch your head and get it over with. I know. October and November have come and passed and all things pumpkin should no longer be a novelty in the house. I had a pumpkin sitting in my window for over a month and it was time to use it up. I turned it into Mesa Grill's Pumpkin Soup and saved the seeds.

When it came time to roasting the seeds I opened my spice cabinet up to draw some inspiration for a flavor combination I have never tried before. What was staring right at me were the spices I used from the pumpkin soup and thought why not give it a shot? If they tasted great in the soup they will taste great flavoring the pumpkin seeds.

No exact amounts. I grabbed my spices along with some honey, maple syrup, and vegetable oil and put a little of this and a dash of that into a mixing bowl. I added my pumpkin seeds and gave them a toss in the sweetened mixture and laid them in a single layer on the baking sheet.

They only took 20 minutes to roast. The dogs were going pumpkin seeds nuts over the sound of the pumpkin seeds cracking open and popping about in the oven. I knew it was time to pull them out. The smell from the cinnamon and maple syrup was so aromatic that I couldn't wait to pull the baking sheet out of the oven and get my hands all over these.

I have never had pumpkin seeds on the sweet side. I was sure missing out! Let me tell you... these were the most incredibly tasty pumpkin seeds ever! I never eat the shells but these were so perfectly roasted and flavored that I just popped them in my mouth and ate the shells as well. FAN-FREAKIN'-TASTIC! My entire batch was gone in the blink of an eye. It was a small pumpkin and gave me about a 1/2 cup of the pumpkin seeds.

Saving this "recipe" in my safe spot, here on my blog, for a reminder to make pumpkin seeds the same way next year... is it October yet? Sigh. They were here and now they are gone like the novelty of the pumpkin until next season.

Pumpkin Pie Pumpkin Seeds
Stars of the Show:
*Make the mixture to your tastes. I added a dash of each seasoning until the spice was just to my liking. Do the same! You'll be glad you gave this a try!*
  • 1 tbsp vegetable oil
  • ground cinnamon
  • ground ginger
  • allspice
  • nutmeg
  • honey
  • maple syrup
  • pumpkin seeds
And Action:

Preheat the oven to 300 degrees. In a bowl combine the vegetable oil through maple syrup and whisk to combine. Add the pumpkin seeds to the bowl and toss to coat the seeds. Lay the pumpkin seeds on a single layer on a baking sheet. Place the baking sheet in the oven and stir every 10 minutes until the pumpkin seeds are toasted to your heart's desire.

December 05, 2010

Orange You Glad For Vitamin C?

In an email forwarded to me from my Uncle were photos from an orange festival that was held in the Netherlands. Anytime I see any sort of artwork it makes me envious. My stick people are enough to make a kindergartener shutter.

Here's to getting your daily dose of Vitamin C!


December 04, 2010

Mesa Grill's Pumpkin Soup

I look forward to checking out Foodbuzz's Daily Top 9. One of those days I came across this recipe for Mesa Grill's Pumpkin Soup from Kelsey's blog over at Apple A Day through Foodbuzz. Her photo of the soup was crave worthy. A scan of the ingredients list had me giddy considering the fact that all of the items were on hand and one more meal was able to be added to the roster of meals to make to eat up what we have on hand. Please check out her blog to see the beauty that is of this pumpkin soup and how it really should have turned out. A key ingredient of mine ended up being rancid and did not make it's way into the dish.


While making my Rosemary Focaccia I set to making this soup. It has been on my mind for two days now and the orange gourd sitting in the window as a decoration of the month of October and November had seen the end of it's days. I mean come on... don't pumpkin dishes kind of lose their seasonal charm after all of the Thanksgiving leftovers have been consumed?

Never having roasted a pumpkin or any other squash I had no idea how. After a quick search on the good ol' Internet and a pictorial I was on my way to fresh not from a can pumpkin puree sans food processor just elbow grease and a fork. Okay so it didn't turn out smooth but it still tasted incredible and I can look past the chunks of pumpkin.


The real issue came when it was time to add the sour cream. Just the day before my container of sour cream looked and smelt fresh. Upon opening the container lid my stomach started to turn and I threw it away. No other creams on hand I felt stiffed out of the full experience of what this dish had in store.

What I ended up with was a spicy pumpkin soup with a broth base. It was still incredibly flavorful. In a text to my mom, "but it burns so good", is how I described the soup. Nothing a glass of milk couldn't tame. Next time I'll be sure to make sure the sour cream is fresh in order to help cut the heat from the chipotle pepper. You have to see the real deal to see how this should look and be garnished with. Absolutely beautiful with it's vibrant orange color compared to my murky brown color. My color came from the fact that I used the full amount of chicken broth before making measuring out how much pumpkin puree I had.


Nonetheless this was absolutely delicious and will need a redo in my kitchen so I can get it right! Another inquiry I have to all of my fellow food bloggers who turn out incredible photography... what kind of camera should I tell Mr. Sideline Chef Santa he needs to bring me? This little Kodak point and shoot isn't doing the job of providing good enough food porn. Thank you in advance for the tips and ideas!

I'm not going to post the recipe on my blog. I would rather you head on over to Kelsey's Apple A Day Blog and get the recipe from there and check out her photography. I can't stress it enough. This is why she made Foodbuzz's Daily Top 9! Really? Why are you still on my page? Haha!

December 03, 2010

Rosemary Focaccia

My taste buds were in serious need of a shake up. After ending the night before on a low with the Ginger White Rice they needed to be shook up.

My morning started out with a cup of coffee, 2 egg whites, and bacon. Bacon is my love. I would give up my first fourth child in return for a lifetime supply of bacon. I say my fourth child because I only have one and I don't see Mr. Sideline Chef and I having more than 2 more babies. Knock on wood we don't end up with triplets on our next attempt because then it will be adios numero four. For lunch I continued on with eating up some of the leftovers, Ginger White Rice and the Baked Italian Shrimp. Both of those weren't worth a damn for leftovers. As you read from yesterday's post the rice was bland and the Baked Italian Shrimp aren't good reheated since the breaded crust gets soggy. I also grabbed 3 pieces of Hormel's Natural Choice Oven Roasted Turkey Breast and rolled them up and ate them as a quick snack.

Bacon was the highlight of my diet for the day. Bacon never lets me down. By the time dinner rolled around I wanted something with flavor and a change of pace.


I did some searching on MyRecipes.com and found a recipe for Rosemary Focaccia. Done. Also while reading some of my favorite blogs that I follow I came across a recipe for Mesa Grill's Pumpkin Soup. Done. I'll be sharing more about the pumpkin soup tomorrow.

After 3 hours spent in and out of the kitchen I had made my dough, let it rise, prepared my pumpkin puree, punched my dough down, another rise, and then had fresh baked Rosemary Focaccia to go with my pumpkin soup. My timing was not the best considering the fact that I was sitting down for dinner at 8 p.m. My bedtime is usually around 10 p.m. and dinner is usually around 6 p.m. Not a big advocate for myself eating dinner so close to bed time but I made an exception. Once again I am left hoping that my afternoon workout will do my waistline justice after eating four pieces of the focaccia. It was so delicious and addictive. When is fresh bread not?

My taste buds were very grateful for fresh baked bread and a nice big bowl of spicy pumpkin soup. The Rosemary Focaccia had a beautiful airy texture with a slight bite to it. The rosemary salt topping was incredible. My first time making focaccia bread and it was a success and so easy to make.

Going to be using the bread for turkey sandwiches and a side to my pumpkin soup. Wahoo for flavor!!!

MyRecipes.com and Cooking Light, January 2005
Makes 14 servings

Stars of the Show:
  • 1 1/4 cup boiling water
  • 3 tbsp fresh chopped rosemary, divided - I used dried rosemary.
  • 1 tbsp honey - I used sugar free honey. Trying to keep my sugar intake to a minimum with the knowing that holiday cookie trays are just around the corner.
  • 1 package dry yeast (about 2 1/4 tsp)
  • 3 3/4 cups all purpose flour, divided
  • 1/4 cup olive oil, divided - I ran out of olive oil after adding what I needed to my dough and had to use vegetable oil when I did my egg wash.
  • 1 tsp salt
  • cooking spray
  • 1 tsp water
  • 1 large egg yolk
  • 1 tsp sea salt
And Action:

Combine boiling water, 1 tsp rosemary, and honey in a large bowl, cool to cool to 100° to 110°. Sprinkle the yeast over the honey mixture, and let stand for 5 minutes. Lightly spoon flour into dry measuring cups and level with a knife. Add 3 1/4 cups flour, 2 tbsp oil, and 1 tsp salt to the honey mixture, stirring to form the dough. Turn the dough onto a lightly floured surface. Knead until smooth and elastic for about 10 minutes. Add enough of the remaining flour 1 tbsp at a time to prevent the dough from sticking to your hands.


Place dough in a large bowl coated with cooking spray and making sure to coat the top. Cover and let rise in a warm place (85°) free from drafts, I choose putting it on the dryer while it's running, 45 minutes or until doubled in size. Gently press two fingers into dough. If the indentation stays then the dough is ready. Punch it down. Pat dough into a 14x12-inch rectangle on a coated baking sheet. Cover and let rise 20 minutes or doubled in size.

Preheat oven to 350º.

Uncover dough and make indentations on the top of the dough using your fingertips or a wooden spoon handle. Combine 1 tbsp oil, 1 tsp water, and the egg yolk, brush over the dough. Drizzle the remaining 1 tbsp oil and sprinkle with remaining rosemary and sea salt.

Bake for 25 minutes or until lightly browned. Remove from pan and let cool on a wire rack.

Nutritional Information:
Calories: 166 (25% from fat)
Fat: 4.6g (sat 0.7g,mono 3g,poly 0.6g)
Protein: 3.9g
Carbohydrate: 27.1g
Fiber: 1.1g
Cholesterol: 15mg
Iron: 1.7mg
Sodium: 335mg
Calcium: 9mg
Related Posts Plugin for WordPress, Blogger...