Showing posts with label Cheese. Show all posts

September 05, 2014

Hawaiian Grilled Cheese

(Photo from Fitness Magazine)

Over Summer break Little Man took cooking classes at his Summer camp. One day he told me about something he made that was "even better than peanut butter and jelly!!!". He ran through the recipe for Hawaiian Grilled Cheese sandwiches and requested we make them sometime. Later that weekend I came across a recipe in Fitness Magazine for them, ripped it out, and posted it up on our family calendar as a reminder to grab the ingredients on our Sunday grocery trip.

These sandwiches are so good with a tropical twist from the pineapple. So good, that Little Man requested I make an extra to pack for his school lunch tomorrow.

Because the ham and pineapple combination reminds me of one of my favorite pizza combinations I think substituting the BBQ sauce for marinara would be amazing or doing as Little Man did and using his favorite, honey mustard. No matter the condiment choice, give these a try. Yummy!

Adapted from: Fitness Magazine
Makes 4 Servings

Stars of the Show:
  • 8 slices multigrain bread
  • 8 oz Virginia ham
  • 1 cup pineapple, sliced thinly 
  • 4 slices muenster cheese
  • 4 tsp BBQ sauce
And Action:

Divide ham, pineapple, and cheese among half the slices of bread. Spread the BBQ sauce on remaining slices and top sandwiches.

Cook sandwiches in a panini press or do like I did and spray a nonstick skillet with nonstick spray over medium heat. Place sandwich in skillet and place another skillet on top of the sandwich weighing it down with a heavy can. Cook about 1 1/2 minutes and then flip, once again topping with the skillet and heavy can. 

July 18, 2013

Easy Mac & Cheese Veggie Chicken Casserole

The name says it all... Easy! This one dish meal came together for an easy week night recipe that is light on the budget. Based on average retail prices at national supermarkets the total recipe costs $12.79 which is $2.13 a serving. You can make this your own by switching up the veggies and meat. Little Man really loves chicken and broccoli so I kept with the direction of the recipe. I saw a variation that incorporated Mexican flavors and it looked fantastic. If you're a real go getter cook your noodles ahead of time, prep the veggies, and save yourself some of the grunt work by purchasing one of those juicy rotisserie chickens from the deli section. Best part about a casserole is that there are plenty for leftovers.


Makes 6 Servings

Stars of the Show:
  • 4 tbsp butter melted, divided
  • 1 cup 2% milk
  • 8 oz rotini pasta, cooked and drained
  • 2 cups diced cooked chicken
  • 4 cups frozen vegetables, thawed - I used a fresh broccoli crown cut into bite sized pieces.
  • 2 1/4 cup shredded cheddar cheese - I used fat free.
  • 1/4 cup breadcrumbs
  • 1 tbsp grated Parmesan cheese - I used shaved Parmesan cheese. 
And Action:

Preheat oven to 400 degrees. Combine 3 tbsp of butter with the milk, pasta, chicken, veggies, and cheddar cheese in an 8-inch baking dish.

Combine breadcrumbs, Parmesan cheese and remaining butter in a small bowl; sprinkle on top. Bake 30 minutes or until heated through. 

Nutritional Information Per Serving:
Calories: 330
Calories from Fat: 80
Fat: 9 g
Saturated Fat: 3.5 g
Trans Fat: 0 g
Cholesterol: 10 mg
Sodium: 330 mg
Carbohydrates: 46 g
Fiber: 3 g
Sugar: 8 g
Protein: 16 g
Vitamin A: 40%
Vitamin : 8%
Calcium: 20%
Iron: 10%

Check out Weekend Potluck for other great dinner ideas!


September 14, 2011

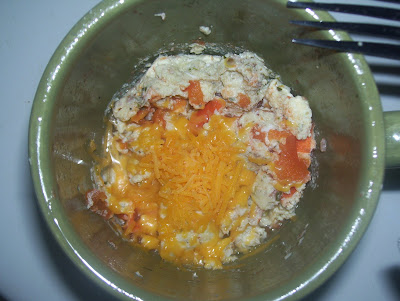
Quick Egg, Tomato, Bacon, and Cheese Mug

Another case of monkey see, monkey do. While I was enjoying a cup of coffee and reading through some new posts from blogs I follow I came to Dara's blog, Cookin' Canuck, and saw a recipe for something I've seen before but was never brave enough to try.

"Egg mug" recipes. The thought of cooking anything in the microwave was kind of a turn off. Another reason I was hesitant on trying a recipe like this is because eggs and I aren't the best of friends. I can only tolerate the texture for so long and have a preference for how I like my eggs cooked with each method.

What gave this time? I had all of the ingredients on hand and if it's good enough for Dara's two boys then it's good enough for me.

Dara's version had mushrooms and ham. I didn't have those items on hand but she stated how versatile the recipe is. You can change the veggies, meats, and cheeses so the possibilities are endless.

Now that I am toying with the idea of going back to work and having Itty Bitty in "school" means that my mornings are about to become pressed for time. It'll be important for me to have breakfast ready to go and us to be out the door on time. Quick and simple breakfast options will be needed.

This "egg mug" recipe is quick and easy to put together. You whisk your eggs and add the other ingredients of choice with some spices. Cook it in the microwave and top it with cheese. Breakfast took all of 5 minutes to make.

It was surprisingly tasty. I was a little put off by the amount of water that was settled at the bottom of my mug though. After draining the water off and transferring it to a plate I was back to enjoying my breakfast. I would make this again. Thank you Dara for sharing your recipe!


Quick Egg, Tomato, Bacon, And Cheese Mug
Adapted from Dara at Cookin' Canuck
Makes 1 Serving

Stars of the Show:
  • 2 eggs
  • 2 tbsp water - I'm not sure if this amount was too much but next time I might not add any and see if that helps.
  • 1/8 tsp black pepper
  • 1 tbsp shredded cheddar cheese
  • 1 beefsteak tomato, no seeds or juice, diced
  • basil - I just eyeballed the amount.
  • oregano - I just eyeballed the amount.
  • 1 slice pan fried bacon, crumbled
And Action:

Spray a 12 oz mug with cooking spray. Crack the eggs into the mug and whisk with the water. Stir in the tomato, bacon, black pepper, basil, and oregano. Microwave for 1 minute. Stir the mixture. Microwave for another 60 to 90 seconds. Mine took 2 minutes to get it to the doneness I prefer. Sprinkle with cheese. 

February 09, 2011

Cheddar Bay Biscuits

We all know those infamous Cheddar Bay Biscuits from Red Lobster. You know those ones that the dietitians tell us to run away from and while we're at it to reduce our sodium intake and do another 50 crunches. Those ones. While Mr. Sideline Chef would tell you these are the main reason he goes to Red Lobster I sing a different tune and look forward to their Caesar Salad without croutons and drool over the menu options before settling on something that isn't probably the healthiest choice.

Just last month Mr. Sideline Chef requested I make rolls for dinner. I made those Honey Yeast Rolls that I thought were incredibly delicious but missed the mark for him. He was referring to something similar to what Red Lobster made. Rolls, biscuits, oh hell, in his mind what's the difference.

I searched the Internet and decided to make the recipe I found first since it sounded simple and I already had all of the ingredients on hand. Simple this recipe is. Flavorful as well. How do these compare to Red Lobster's? Close. The difference is that these are a cheese biscuit with the garlic butter topping. Their biscuits seem to have the cheesy garlic taste baked in and brushed on top as well. When I make these next time I will be sure to mix the topping ingredients into the biscuit mix and then top with extra garlic butter goodness. Then they would be perfect.

Now I know when Mr. Sideline Chef requests rolls for dinner I'll have a go-to recipe. Now if only I could recreate their Caesar Salad and any one of their seafood dishes. Crave worthy!

Allrecipes.com
Makes 20 Servings

Stars of the Show:
  • 4 cups baking mix - I used Bisquick Heart Smart.
  • 3 oz shredded sharp cheddar cheese
  • 1 1/3 cups water
  • 1/2 cup melted butter
  • 1 tsp garlic powder
  • 1/4 tsp salt
  • 1/8 tsp onion powder
  • 1/8 tsp dried parsley
And Action:

Preheat oven to 375 degrees. Spray a baking sheet with nonstick cooking spray. In a large mixing bowl combine the baking mix, cheese, and water. Mix until a firm dough forms. Scoop dough onto the baking sheet using two spoons. Be sure to leave space between each dough scoop. Bake for 10-12 minutes or until golden brown. Combine the melted butter, garlic powder, salt, onion powder, and dried parsley in a small bowl. Brush over the rolls immediately out of the oven.

Don't forget about the Culinary Smackdown Battle! There are 3 great entries so far and would love to see more of what my fellow foodies have or will come up with! Looking forward to tasting and judging and announcing the winner on February 28th, 2011.

February 02, 2011

Jalapeno Cheddar Sausage Kolaches

As of yesterday February's Culinary Smackdown Battle - Hand Held "Pies" was officially launched. Who  better to set the tone than myself? Jalapeno Cheddar Sausage Kolaches.

I first met Mr. Sideline Chef while I was living in the Pacific Northwest in Washington State. I consider the Pacific Northwest my "back home" even though I was raised in Las Vegas, Nevada for the majority of my life. Rainy weather, the Pacific Coast, the rainy weather, and did I mention the rainy weather? I loved it all.

Moving to Texas seemed foreign to me when Mr. Sideline Chef took me South to get me acquainted with where my new home with him would be. Houston, Texas. Ick! The images I had painted in my head were those of men in cowboy hats, horses as the main mode of transportation, and a more "Western" feel. Not in the least bit. This wasn't West Texas. Houston looked like a garbage hole. To this day, 3 1/2 years later, I have not grown to love it here. I'll always love the Oregon/Washington area and Ohio/Pittsburgh (Mr. Sideline Chef is from this area) as my home.
When searching for our first place to live we were touring some apartment buildings and our stomachs began to growl. It was around brunch and didn't really know the area that well. We asked the leasing agent for a recommendation on where to eat. "There's a kolache..." "Bless you!" I interrupt. "...place just right down the road."

Kolaches? Obviously a Southern thing. We blew it off the way that a Texan would probably do to a coffee stand on every corner in the Pacific Northwest. We settled on a hole-in-the-wall donut shop. I don't know why they called it a donut shop when the number of kolaches outnumbered the donuts.

Curiosity tends to get the best of Mr. Sideline Chef and if you tell him "don't do it" he's going to do it. He ordered the infamous Jalapeno Cheddar Sausage Kolache. A sausage flecked with jalapenos and cheddar chunks was nestled between a pillowy bread crust. It was delicious.

To this day we frequent the donut shop. Not for the donuts but for the kolaches. Itty bitty would tell a different tale from the tell tell sign of maple glaze around his mouth and those giveaway sticky fingers. I have never thought to even make my own. That is, until one morning when returning home Mr. Sideline Chef tells me, "I thought you were the Pretend Chef." Heard him loud and clear.

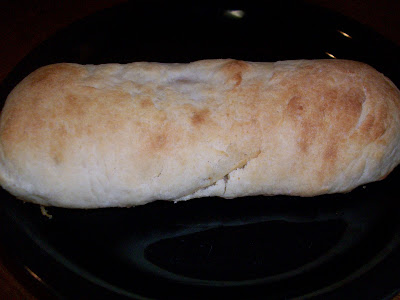
Making kolaches is easier than getting dressed (even on a Sunday morning), loading itty bitty into the car, and driving a mile down the road and walking into a donut shop and picking a few of them up. Okay. That might be a stretch. The donut shop provides convenience but making them provides the quality. The hardest part is patiently waiting for the dough to rise two separate times or maybe it's picking your filling? Make them and find out.

You can even make these ahead, freeze, and reheat in the microwave for a quick grab and go breakfast.

Jalapeno Sausage Kolaches
Makes 12 Servings

Stars of the Show for the Dough:
  • 2 (1/4 oz) packages dry yeast
  • 1/2 cup lukewarm water
  • 1/4 cup butter, softened
  • 1/4 cup shortening
  • 1/4 cup sugar
  • 2 egg yolks
  • 2/3 cup milk
  • 1 tsp salt
  • 4 cups flour
And Action:

In a small bowl dissolve the yeast in the warm water and set aside.

In a large bowl cream together the butter, shortening, and sugar until the mixture is light and fluffy.

Mix in the egg yolks, milk, and salt making sure to combine well.

Stir the dissolved yeast and flour and mix until the ingredients are thoroughly blended into a soft dough.

Place the dough in a large bowl that has been coated with cooking spray making sure to coat the top of the dough. Cover the bowl with a towel and set in a warm place to rise for 1 hour or until doubled in size.

Grease a baking sheet.

Divide the dough into 12 even pieces and roll into a ball. Flatten each piece into a circle and transfer them to the greased baking sheet. Place about 1 inch apart.

Let them rise again in a warm place for 45 minutes or until doubled in size.

Stars of the Show for the Filling:
  • 12 Jalapeno Cheddar Sausages
  • pickled jalapenos (optional)
  • shredded cheddar cheese (optional)
*You can get creative and use whatever other ingredients you would like. Ham and Cheese. Bacon, Egg, and Cheese. The possibilities are endless. Just follow the next steps for filling.

And Action:

Failed first attempt. Be sure not to over stuff the centers!
Place the filling ingredients in the center of the dough circles being careful not to over stuff or else you will tear the dough like my failed first attempt. Lesson learned. Fold one side of the dough over the filling and roll to the other end of the dough. Pinch to seal. Liberally brush the tops with melted butter.
Bake at 425 degrees for 10-12 minutes or until golden brown.

These are best enjoyed when they are fresh from the oven but cooled down enough to handle.

#17 is now marked off on my "Stir The Pot"  page!

Make these or another hand held meat "pie" and be sure to link your recipe to the Culinary Smackdown Battle - Hand Held "Pies".  I would love to see the flavor combination you come up with! Your entry might win you the prize!

January 06, 2011

Scalloped Potatoes with Cheese

I had yet again another Pretend Chef moment tonight when preparing Mr. Sideline Chef's request for scalloped potatoes. I had the oven preheating while the milk was boiling. The potatoes and cheese were layered in the baking dish and ready for the milk to be poured over. After pouring the milk over the potatoes and sliding the baking dish into the oven I set the timer on the microwave for 20 minutes.

Ding. Ding. Ding. The timer went off and I raced over to the oven to pull them out to check to see if the potatoes were fork tender yet. Nope. So back into the oven for another 20 minutes. The recipe had stated 40 minutes for the bake time but since I cut the recipe in half I figured 20 minutes would be enough.

Ding. Ding. Ding. The timer went off again and I raced over to the oven to pull them out once again hoping that was the magic number. Nope. What the hell? My potatoes were turning black and the fork still didn't pierce through easily. "I don't think this is going to turn out," I said to Mr. Sideline Chef in desperation. "Should I just pitch this since it's not working out?" He wanted me to try to salvage it.

My head smacking moment came when I realized that the oven had been turned off at the same time I turned the burner off from my milk being boiled. "This is why I call myself the Pretend Chef because I only pretend I know what the hell I'm doing." It's a good thing Mr. Sideline Chef had patience a big lunch to hold him over. It's also a good thing that once the oven was preheated the scalloped potatoes only took 20 minutes to cook since I ended up having to scrape off the top layer of potatoes to remove the blackened ones.

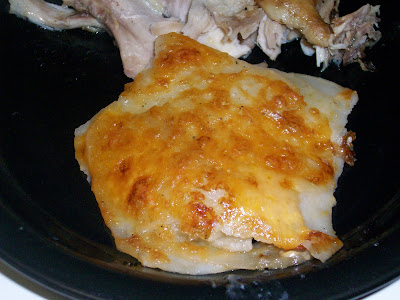
I am not and have never been a scalloped potato fan. I want to be really. I like all of the ingredients in the dish but together they don't play nice with my taste buds. They came out of the oven beautifully. I had high hopes that this would be the time I'd love scalloped potatoes. Nope. Mr. Sideline Chef on the other hand L-O-V-E-D them even though he wanted to see a full fat version on his plate next time and not a light recipe. Understandable. Comfort food generally isn't low fat or low calorie.

Nonetheless this dish is one that will stay at the top of my remakes for Mr. Sideline Chef until I come across that "engagement" scalloped potato recipe.

 Scalloped Potatoes with Cheese
Makes 4 servings (Serving size = 1 cup)

Stars of the Show:
  • 1 garlic clove, chopped
  • cooking spray
  • 3 peeled red potatoes, sliced thin
  • 1 tbsp melted butter
  • 1/4 tsp salt
  • 1/8 tsp black pepper
  • 1/4 cup cheddar cheese
  • 1/2 cup milk
And Action:

Preheat oven to 425 degrees. Coat an 8x8-inch baking dish with the cooking spray. Layer half the potatoes into the bottom of the dish. Add the garlic around the potatoes. Drizzle half the butter and sprinkle with half the salt and pepper. Top with half the cheese. Repeat with the remaining potatoes, butter, salt, and pepper. Boil milk over low and then pour over the mix. Bake for 20 minutes or until tender.
Related Posts Plugin for WordPress, Blogger...